

Quickstart
Installation
The Amplify Command Line Interface (CLI) is a unified toolchain to create, integrate, and manage the AWS cloud services for your app.
- Install Node.js® and NPM if they are not already on your machine.
- Verify that you are running at least Node.js version 8.x or greater and npm version 5.x or greater by running
node -vand npm -v in a terminal/console window - Install and configure the Amplify CLI.
$ npm install -g @aws-amplify/cli
$ amplify configure
Concepts
The Amplify CLI toolchain is designed to work with the Amplify JavaScript library as well as the AWS Mobile SDKs for iOS and Android. Resources in your AWS account that the Amplify CLI category commands create can be easily consumed by the corresponding Amplify library modules or native SDKs.
The Amplify CLI is written in Node.js. It has a pluggable architecture and can be easily extended with additional functionalities.
Click here for more details.
Typical CLI workflow
The following commands should be executed inside your project root directory:
amplify initamplify <category> add/removeamplify push
The init process
$ amplify init
The init command must be executed at the root directory of a project to initialize the project for the Amplify CLI to work with.
The init command goes through the following steps:
- Analyzes the project and confirms the frontend settings
- Carries out the initialization logic of the selected frontend
- If there are multiple provider plugins, prompts to select the plugins that will provide accesses to cloud resources
- Carries out, in sequence, the initialization logic of the selected plugin(s)
- Insert amplify folder structure into the project’s root directory, with the initial project configuration
- Generate the project metadata files, with the outputs of the above-selected plugin(s)
Common CLI commands
amplify <category> <subcommand>amplify env <subcommand>amplify configureamplify consoleamplify deleteamplify helpamplify initamplify publishamplify pushamplify runamplify status
Most categories have the following command structure
amplify <category> addamplify <category> removeamplify <category> push
amplify init
During the init process, the root stack is created with three resources:
- IAM role for unauthenticated users
- IAM role for authenticated users
- S3 bucket, the deployment bucket, to support this provider’s workflow
The provider logs the information of the root stack and the resources into the project metadata file (amplify/backend/amplify-meta.json).
The root stack’s template can be found in amplify/backend/awscloudformation.
amplify add
Once init is complete, run the command amplify add <category> to add resources of a category to the cloud. This will place the a CloudFormation template for the resources of this category in the category’s subdirectory amplify/backend/<category>, and insert its reference into the above-mentioned root stack as the nested child stack.
amplify push
Once you have made your category updates, run the command amplify push to update the cloud resources. The CLI will first upload the latest versions of the category nested stack templates to the S3 deployment bucket, and then call the AWS CloudFormation API to create / update resources in the cloud. Based upon the resources added/updated, the aws-exports.js file (for JS projects) and the awsconfiguration.json file (for native projects) gets created/updated.
Category usage
Auth Examples
Configuring auth without social providers
$ amplify add auth ##"amplify update auth" if already configured
Select Default configuration:
Do you want to use the default authentication and security configuration?
❯ Default configuration
  Default configuration with Social Provider (Federation)
  Manual configuration
  I want to learn more.
Configuring auth with social providers
$ amplify add auth ##"amplify update auth" if already configured
Select Default configuration with Social Provider (Federation):
Do you want to use the default authentication and security configuration?
  Default configuration
❯ Default configuration with Social Provider (Federation)
  Manual configuration
  I want to learn more.
Adding a Lambda Trigger
Lambda triggers are useful for adding functionality during certain lifecycles of the user registration and sign-in process of your application. Amplify ships common trigger templates which you can enable and modify (if necessary) through a few simple questions. Alternatively, you can build your own auth challenges manually.
There are two ways to setup Lambda Triggers for your Cognito User Pool.
- In the default Auth CLI workflow, you will be presented with a list of Lambda Trigger templates if you opt to configure advanced settings:
$ Do you want to enable any of the following capabilities?
  ❯ ◯ Add Google reCaptcha Challenge
    ◯ Email Verification Link with Redirect
    ◯ Add User to Group
    ◯ Email Domain Filtering (blacklist)
    ◯ Email Domain Filtering (whitelist)
    ◯ Custom Auth Challenge Flow (basic scaffolding - not for production)
- In the manual Auth CLI workflow, you will be given the change to select the options above, but will also be able to manually configure Lambda Trigger templates:
$ Do you want to configure Lambda Triggers for Cognito? Yes

$ Which triggers do you want to enable for Cognito?
◯ Learn More
 ──────────────
 ◯ Create Auth Challenge
❯◉ Custom Message
 ◯ Define Auth Challenge
 ◯ Post Authentication
 ◯ Post Confirmation
 ◯ Pre Sign-up
 ◯ Verify Auth Challenge Response

$ What functionality do you want to use for Custom Message
 ◯ Learn More
 ──────────────
❯◉ Send Account Confirmation Link w/ Redirect
 ◯ Create your own module
If your manually-configured Lambda Triggers require enhanced permissions, you can run amplify function update after they have been initially configured.
Available Cognito Trigger Templates
The pre-populated templates provided by the Amplify CLI can be found here.
API Examples
REST
REST endpoints which enables CRUD operations on an Amazon DynamoDB table
During the CLI setup, you’ll be guided through to create a new Lambda function with a predefined serverless-express template with routing enabled for your REST API paths with support for CRUD operations to DynamoDB tables (which you can create by following the CLI prompts or use the tables which you’ve already configured using the amplify add storage command).
$ amplify add api
? Please select from one of the below mentioned services REST
? Provide a friendly name for your resource to be used as a label for this category in the project: myRESTAPI
? Provide a path (e.g., /items) /items
? Choose a Lambda source Create a new Lambda function
? Provide a friendly name for your resource to be used as a label for this category in the project: betatest1d2654ef
? Provide the AWS Lambda function name: betatest1d2654ef
? Choose the function template that you want to use:
❯ CRUD function for Amazon DynamoDB table (Integration with Amazon API Gateway and Amazon DynamoDB)
  Serverless express function (Integration with Amazon API Gateway)
REST endpoints that triggers Lambda functions with a predefined simple serverless-express template
During the CLI setup, you’ll be guided through to create a new Lambda function with a predefined serverless-express template with routing enabled for your REST API paths.
$ amplify add api
? Please select from one of the below mentioned services REST
? Provide a friendly name for your resource to be used as a label for this category in the project: myRESTAPI
? Provide a path (e.g., /items) /items
? Choose a Lambda source Create a new Lambda function
? Provide a friendly name for your resource to be used as a label for this category in the project: betatest1d2654ef
? Provide the AWS Lambda function name: betatest1d2654ef
? Choose the function template that you want to use:
  CRUD function for Amazon DynamoDB table (Integration with Amazon API Gateway and Amazon DynamoDB)
❯ Serverless express function (Integration with Amazon API Gateway)
REST endpoints backed up by custom lambda function present in the current Amplify project
During the CLI setup, you’ll be guided through to use your own Lambda functions which you’ve initialized as a part of your CLI project using the amplify add function command. This would allow you to have custom logic in your Lambda function and not use the predefined serverless-express templates generated by the CLI as in the examples above.
$ amplify add api
? Please select from one of the below mentioned services REST
? Provide a friendly name for your resource to be used as a label for this category in the project: myRESTAPI
? Provide a path (e.g., /items) /items
? Choose a Lambda source
  Create a new Lambda function
❯ Use a Lambda function already added in the current Amplify project
GraphQL
You can spin up a GraphQL API via the Amplify CLI with the following flow:
$ amplify add api
? Please select from one of the below mentioned services (Use arrow keys)
❯ GraphQL
  REST
To learn more, take a look at the GraphQL Transformer docs.
Functions Examples
You can add a Lambda function to your project which you can alongside a REST API or as a datasource, as a part of your GraphQL API using the @function directive.
$ amplify add api
? Provide a friendly name for your resource to be used as a label for this category in the project: lambdafunction
? Provide the AWS Lambda function name: lambdafunction
? Choose the function template that you want to use: (Use arrow keys)
❯ Hello world function
  CRUD function for Amazon DynamoDB table (Integration with Amazon API Gateway and Amazon DynamoDB)
  Serverless express function (Integration with Amazon API Gateway)
- The
Hello World functionwould create a basic hello world Lambda function - The
CRUD function for Amazon DynamoDB table (Integration with Amazon API Gateway and Amazon DynamoDB)function would add a predefined serverless-express Lambda function template for CRUD operations to DynamoDB tables (which you can create by following the CLI prompts or use the tables which you’ve already configured using theamplify add storagecommand) - The
Serverless express function (Integration with Amazon API Gateway)would add a predefined serverless-express Lambda function template with routing enabled for your REST API paths.
You can update the Lambda execution role policies for your function to access other resources generated and maintained by the CLI, using the CLI
$ amplify update api
Please select the Lambda Function you would want to update: lambdafunction
? Do you want to update permissions granted to this Lambda function to perform on other resources in your project? Yes
? Select the category (Press <space> to select, <a> to toggle all, <i> to invert selection)
❯◉ api
 ◯ function
 ◯ storage
 ◯ auth
? Select the operations you want to permit for betatest (Press <space> to select, <a> to toggle all, <i> to invert selection)
❯◉ create
 ◯ read
 ◯ update
 ◯ delete

You can access the following resource attributes as environment variables from your Lambda function
var environment = process.env.ENV
var region = process.env.REGION
var apiBetatestGraphQLAPIIdOutput = process.env.API_BETATEST_GRAPHQLAPIIDOUTPUT
var apiBetatestGraphQLAPIEndpointOutput = process.env.API_BETATEST_GRAPHQLAPIENDPOINTOUTPUT
Behind the scenes, the CLI automates populating of the resource identifiers for the selected resources as Lambda environment variables which you will see in your function code as well. This process additionally configures CRUD level IAM policies on the Lambda execution role to access these resources from the Lambda function. For instance, you might grant permissions to your Lambda function to read/write to a DynamoDB table in the Amplify project by using the above flow and the appropriate IAM policy would be set on that Lambda function’s execution policy which is scoped to that table only.
Storage Examples
S3 Lambda Triggers
You can associate a trigger to an S3 bucket managed by the Amplify CLI, by following the amplify add/update storage flows. When attempting to add/update an S3 storage resource, you would get the following CLI prompts to add a trigger for it.
? Do you want to add a Lambda Trigger for your S3 Bucket? Yes
? Select from the following options
❯ Choose an existing function from the project
  Create a new function
As you can see in the prompt above, you can either choose to use an existing Lambda function created using the CLI as a part of this project using amplify add function or create a new function with a base Lambda function to handle S3 events. We also auto-populate the IAM policies required by the Lambda execution role of the newly created function to access the S3 bucket.
Note: You can associate only one Lambda Function trigger to an S3 bucket.
DynamoDB Lambda Triggers
You can associate a Lambda trigger with a DynamoDB table, managed by the Amplify CLI, using the amplify add/update storage flows. When attempting to add/update a DynamoDB storage resource, you would get the following CLI prompts to add a trigger for it.
? Do you want to add a Lambda Trigger for your Table? Yes
? Select from the following options (Use arrow keys)
❯ Choose an existing function from the project
  Create a new function
As you can see in the prompt above, you can either choose to use an already existing Lambda function created using the CLI as a part of this project using amplify add function or create a new function with a base Lambda function handle DynamoDB events.
Note: You can associate more than one Lambda Function trigger to a DynamoDB table.
Multiple Frontends
The amplify configure project command is an advanced command and not commonly used for getting started or individual development projects.
The command should be used in the following cases:
- When wanting to modify the project and AWS configurations set during the
amplify initstep - When sharing the same cloud backend across multiple frontends (JavaScript, iOS, Android)
Note: When sharing your backend infrastructure between multiple frontend projects or between different machines, you will need to first manually copy the amplify/ directory from your current project to the other project’s root directory and then run the amplify configure project command.
The amplify configure project command helps you with the following:
- Modifying the existing configurations present in the
.config/directory tied to your project and re-configuring your AWS credentials as well (based on profile on your local machine). - If you re-configure the frontend framework of your project it creates the corresponding configuration files required by your frontend code. For example, if you want to change your frontend from a javascript-based react app to an android app it generates a corresponding
awsconfiguration.jsonfile which could be fed into the AWS Mobile SDK APIs.
What happens behind the scenes?
- The
.config/directory is generated in theamplify/directory if not already present and thelocal-aws-info.json,local-env-info.jsonandproject-info.jsonfiles are configured to reflect the selections made as a part of theamplify configure projectcommand.
Alternatively, you could use the amplify env import command to pull in an environment from another project. Here’s a sample usage of the same
  #!/bin/bash
  set -e
  IFS='|'

  AWSCLOUDFORMATIONCONFIG="{\
  \"Region\": \"us-east-1\",\
  \"DeploymentBucketName\": \"mytestproject-20181106123241-deployment\",\
  \"UnauthRoleName\": \"mytestproject-20181106123241-unauthRole\",\
  \"StackName\": \"mytestproject-20181106123241\",\
  \"StackId\": \"arn:aws:cloudformation:us-east-1:132393967379:stack/mytestproject67-20181106123241/1c03a3e0-e203-11e8-bea9-500c20ff1436\",\
  \"AuthRoleName\": \"mytestproject67-20181106123241-authRole\",\
  \"UnauthRoleArn\": \"arn:aws:iam::132393967379:role/mytestproject67-20181106123241-unauthRole\",\
  \"AuthRoleArn\": \"arn:aws:iam::132393967379:role/mytestproject67-20181106123241-authRole\"\
  }"
  PROVIDER_CONFIG="{\
  \"awscloudformation\":$AWSCLOUDFORMATIONCONFIG\
  }"


  AWS_CONFIG="{\
  \"configLevel\":\"project\",\
  \"useProfile\":true,\
  \"profileName\":\"default\"\
  }"

  amplify env import \
  --name dev \
  --config $PROVIDER_CONFIG \
  --awsInfo $AWS_CONFIG \
  --yes
You can get the AWSCLOUDFORMATIONCONFIG from the team-provider-info.json file from your existing Amplify project in the amplify/ directory of the project.
Custom Cloudformation Stacks
The Amplify CLI provides escape hatches for modifying the backend configurations generated in the form of Cloudformation templates by the CLI. This allows you to use the CLI for common flows but also any advanced scenarios which aren’t provided in the standard category workflows.
-
For your GraphQL API generated by the Amplify CLI, you have the ability to override resolvers as well as add your own custom resolvers to add on to the CLI generated Cloudformation stacks.
-
For majority of the other categories, you can locally edit and manage the Cloudformation file generated by the CLI in the
amplify/backend/<category>/<cloudformation-template.json/yml>location. Read more about Cloudformation -
For adding and deploying a Cloudformation stack for an AWS Service not supported by the Amplify CLI currently, go through the following steps:
- Modify
amplify/backend/backend-config.jsonin your project:{ "<custom-category-name>": { "<custom-resource-name>": { "service": <custom-aws-service-name>, "providerPlugin": "awscloudformation" } }, "hosting": { "S3AndCloudFront": { "service": "S3AndCloudFront", "providerPlugin": "awscloudformation" } } } - Under
amplify/backendfolder, make a folder structure like the following:amplify \backend \<custom-category-name> \<custom-resource-name> parameters.json template.json \hosting parameters.json template.jsontemplate.jsonis a cloudformation template, andparameters.jsonis a json file of parameters that will be passed to the cloudformation template. Additionally, theenvparameter will be passed in to your cloudformation templates dynamically by the CLI. - Run
amplify env checkout <current-env-name>to populate the CLI runtime files and make it aware of the newly added custom resources
Environments & Teams
Concepts
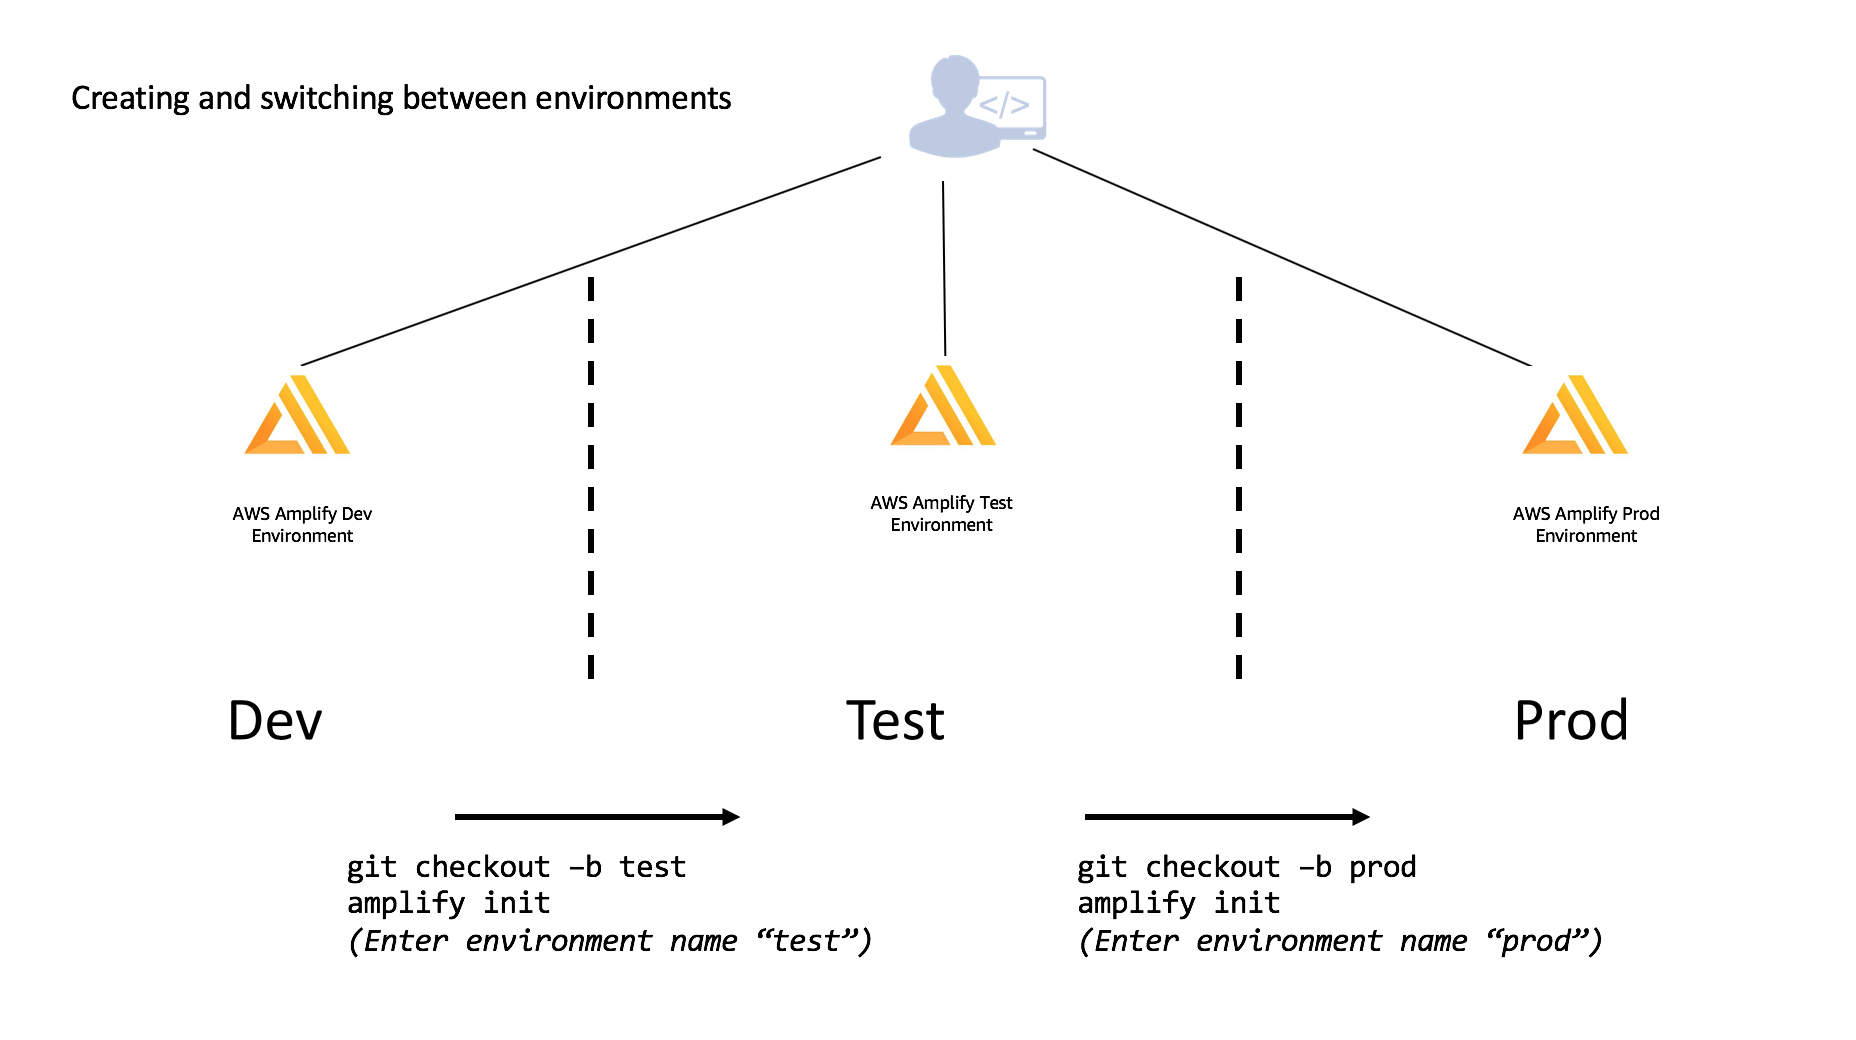
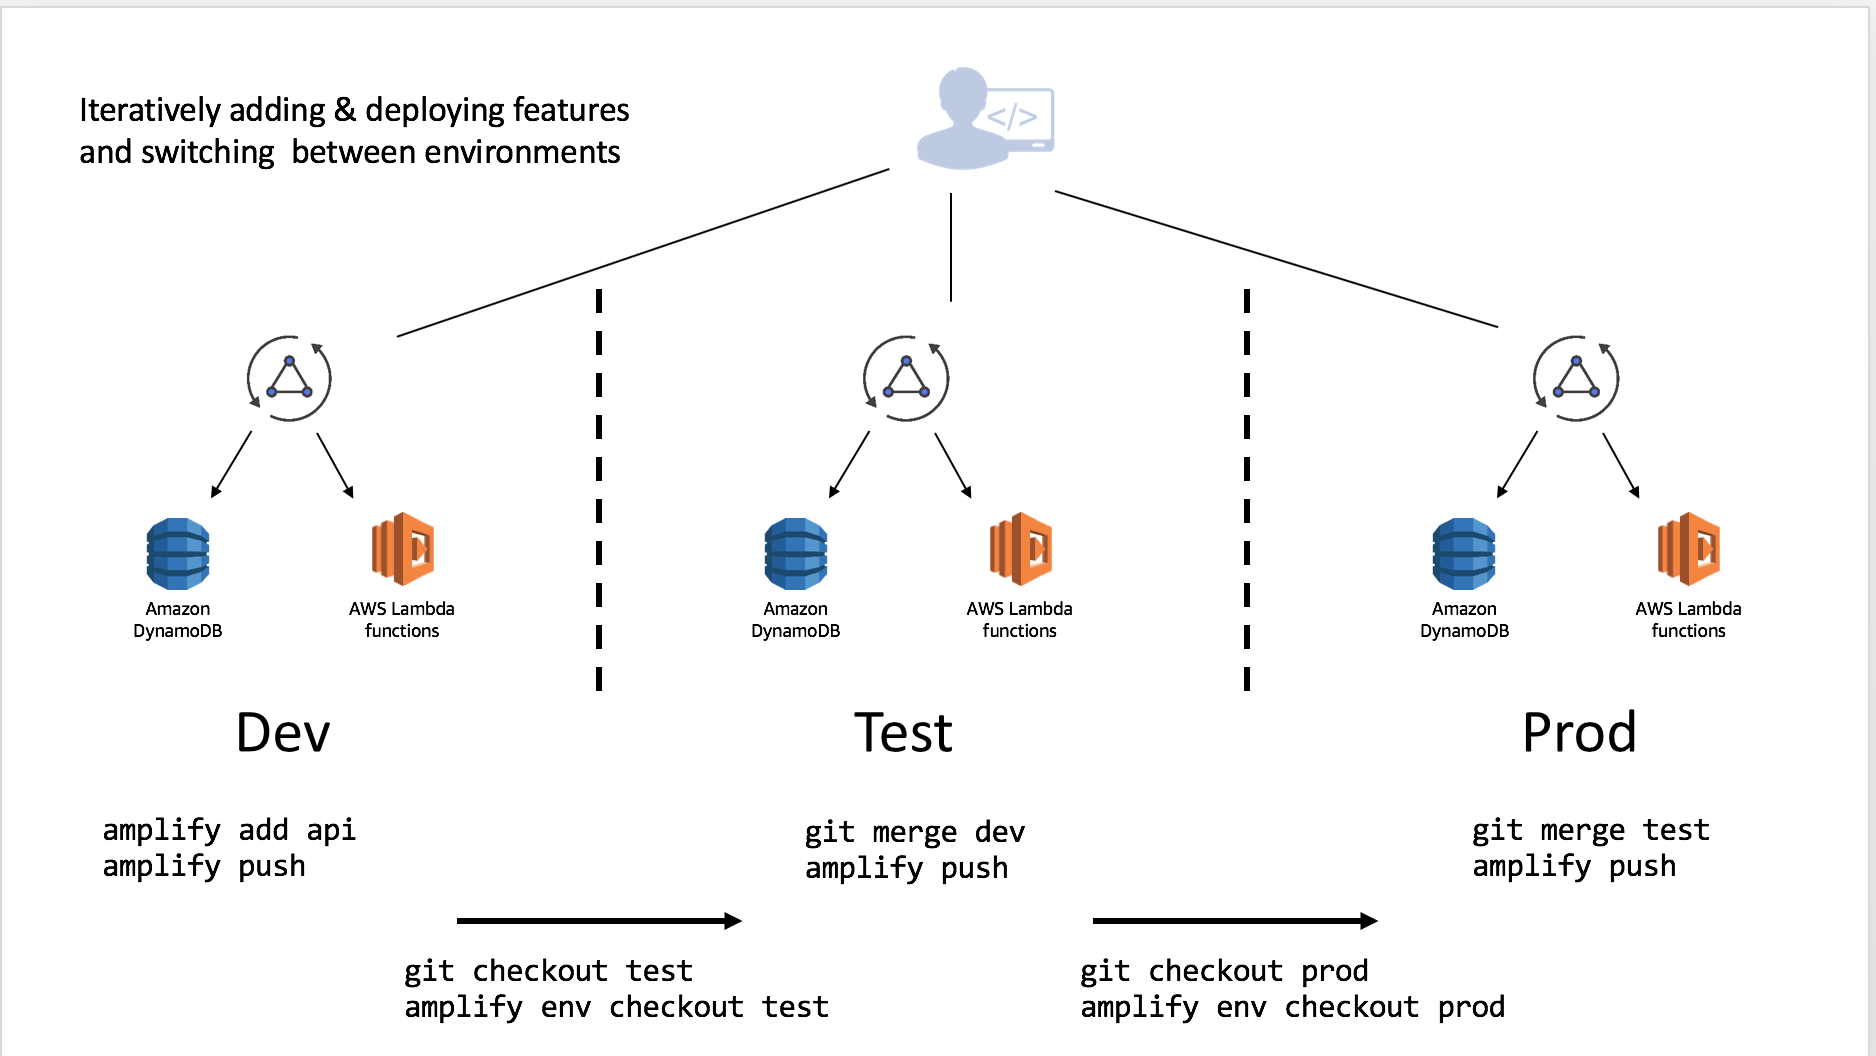
Amplify fits into the standard Git workflow where you switch between different branches using the env command. Similarly to how you will run git checkout BRANCHNAME you will run amplify env checkout ENVIRONMENT_NAME. The below diagram shows a workflow of how to initialize new environments when creating new git branches.
You can independently add features to each environment which allows you to develop and test before moving them to different stages. This is contingent on which branch you ran a checkout from using Git. Using the same example above of Dev being the base which Test and Prod were derived, you could add (or remove) features and merge & deploy accordingly once you are comfortable with your setup.
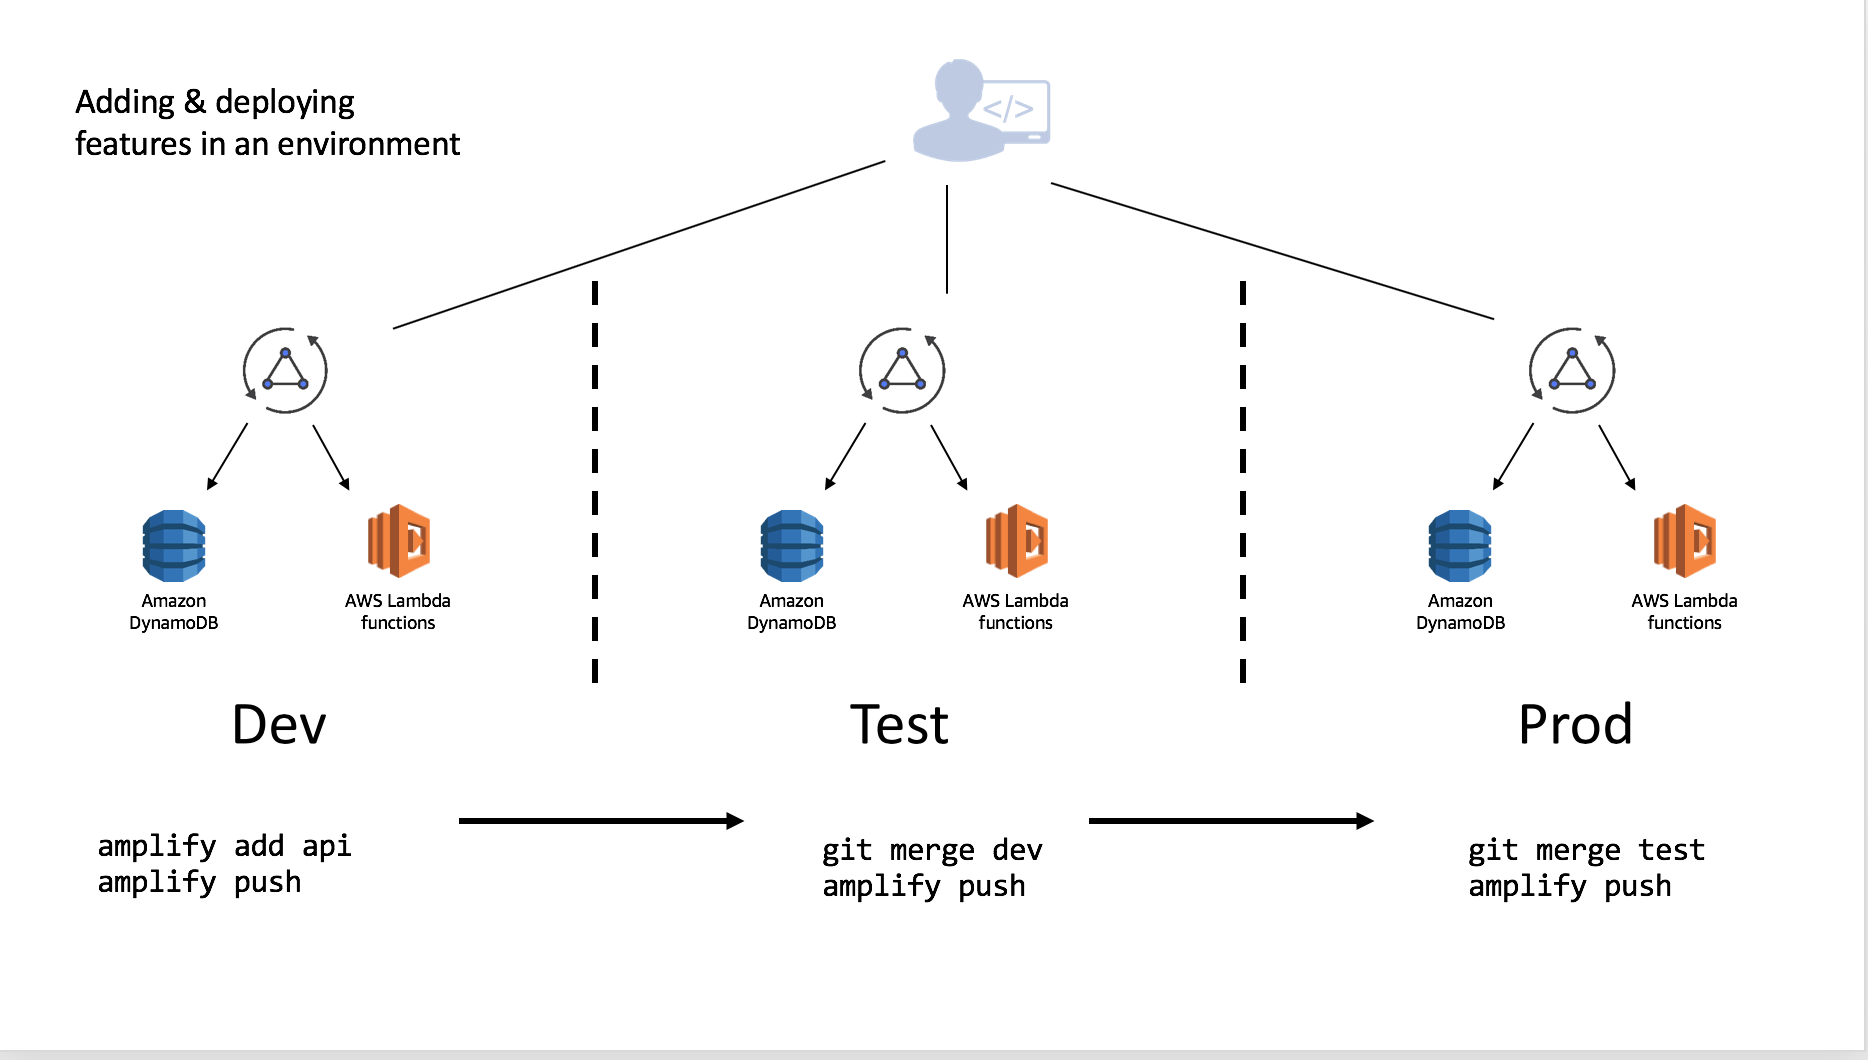
This can be done in an iterative manner as you work through your deployment pipeline:
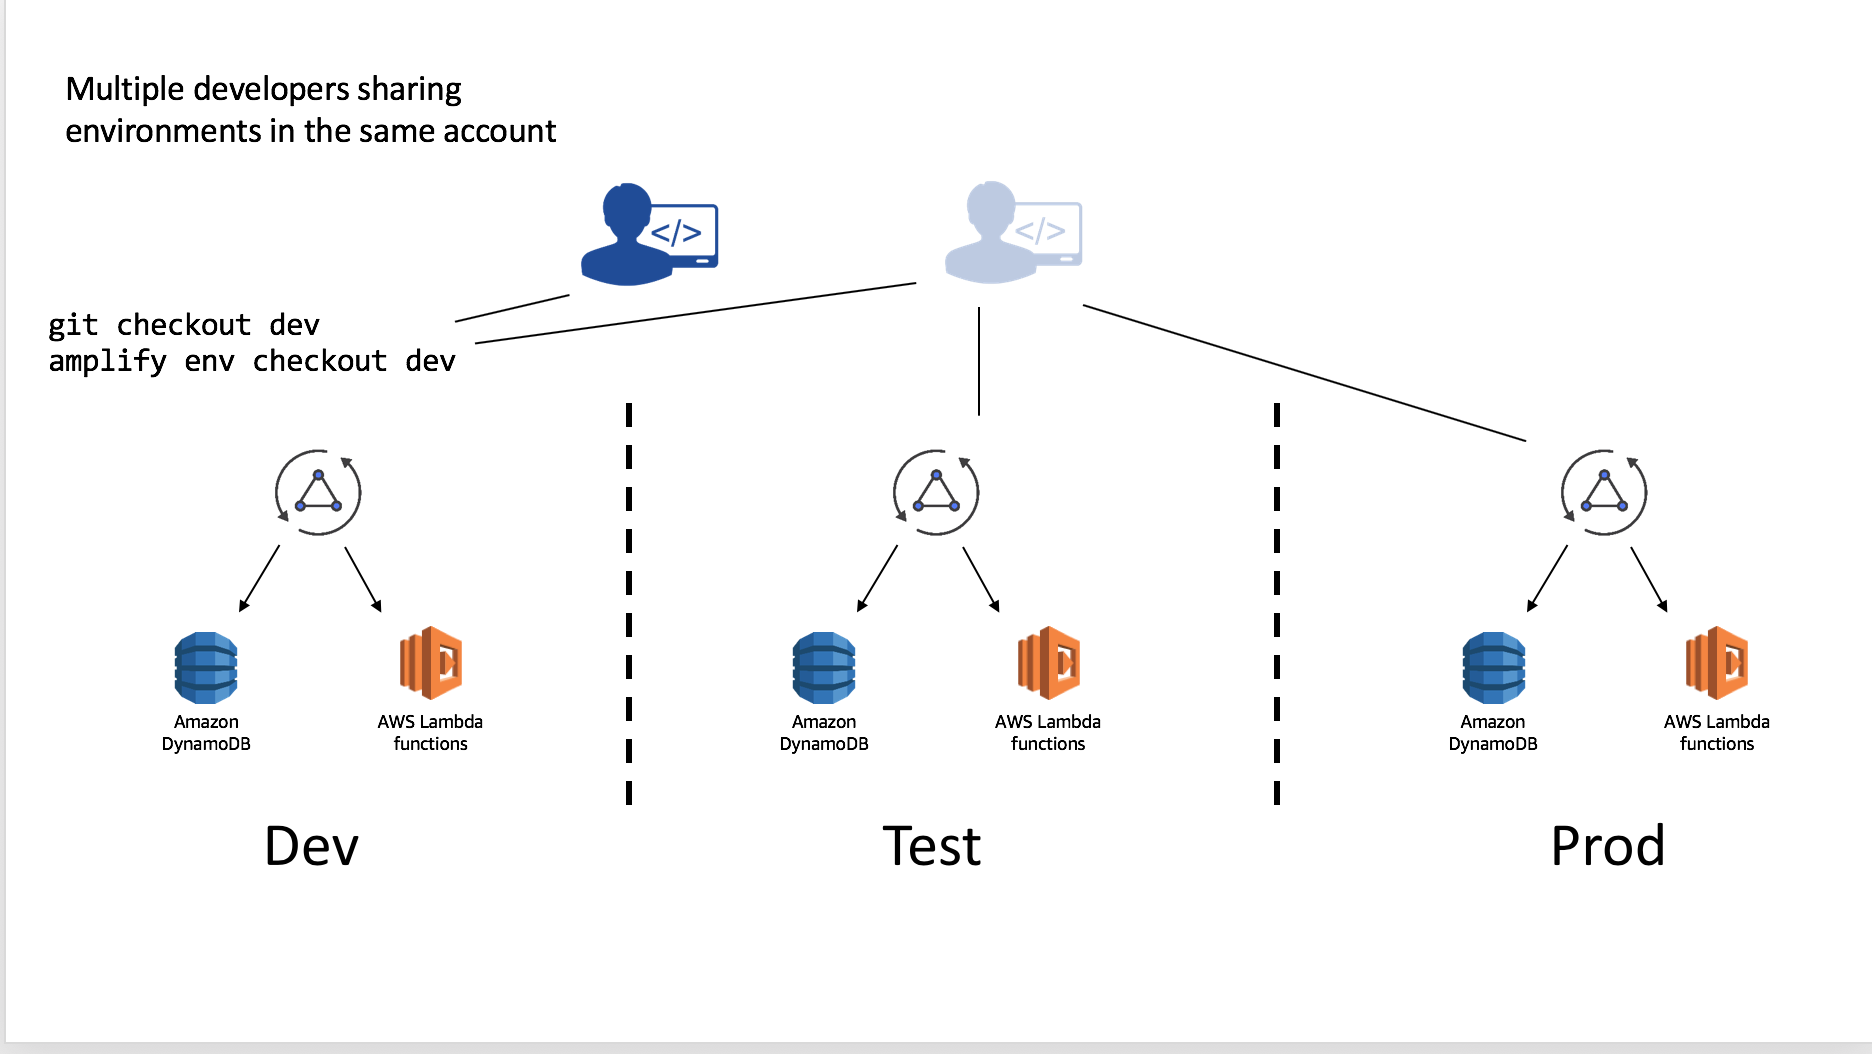
Multiple developers on a team can also share and manipulate the environment as well by using the credentials in the account. For instance suppose they wanted to test a change to the API without impacting the Test or Prod deployments. This will allow them to test the configured resources and, if they have been granted appropriate CloudFormation permissions, they can push resources as well to the backend with amplify push.
You can alternatively, have developers setup their own isolated replica of these environments in different AWS account. To do this simply:
- Clone the existing project
- Run
amplify env addand set up a new environment (e.g. “mydev”) with that developer’s account and AWS profile - Deploy with
amplify push
This workflow can be used to share complete Amplify projects with people outside of your organization as well by committing the project into a Git repository. If you are doing this remove (or add to the .gitignore) the team-provider-info.json which is located in the amplify directory. You can learn more about this file here.
Continuous deployment and Hosting
The Amplify CLI supports basic web application hosting with Amazon S3 and CloudFront. You can use the multi-environments feature with the Amplify Console for a fully managed web application hosting and continuous deployment solution. For more information please learn more in the official documentation.
Setting up master and dev environments
Create a Git repository for your project if you haven’t already. It is recommended managing separate Git branches for different environments (try to have the same branch name as your environment name to avoid confusion). From the root of your project, execute the following commands:
$ amplify init
? Enter a name for the environment master
// Provide AWS Profile info
// Add amplify categories using `amplify add <category>`
$ git init
$ git add <all project related files>
$ git commit -m "Creation of a master amplify environment"
$ git remote add origin git@github.com:<repo-name>
$ git push -u origin master
Note: When you initialize a project using the Amplify CLI, it appends (if a gitignore file exists at the root of the project) or creates one for you (if a gitignore file doesn’t exist at the root of your project), with a list of recommended files to check in from the Amplify CLI generated list of files, into your Git repository.
Once you have your ‘master’ branch setup in Git, set up a ‘dev’ environment in your Amplify project (which would be based on your ‘master’ environment), and then walk through the following steps to create a corresponding git branch for it.
$ amplify env add
? Do you want to use an existing environment? No
? Enter a name for the environment dev
// Provide AWS Profile info
This will set up another environment for the project in the cloud. The backend-configs and resources are now cloned from the ‘master’ environment. Run amplify push to provision all the AWS resources for your new environment (dev).
Now push the changes to the ‘master’ branch (you would just see changes to the team-provider-info.json file - when running a git status command, which has cumulative stack information for all the project environments which are useful when you want to share the same backend within a team). After this, let’s create a new git branch - ‘dev’ corresponding to the new environment we just created.
$ git add .
$ git commit -m "Creation of a dev amplify environment"
$ git push -u origin master
$ git checkout -b dev
$ git push -u origin dev
Team workflow
Sharing a project within a team
There are two ways to work with Amplify projects within a team:
- Team members working on their own sandbox environments (Recommended)
- Team-members sharing the same dev backend to work on
Team-members working on their own sandbox environments (Recommended)
Now you have two independent environments (master & dev) in the cloud and have corresponding git branches with your amplify backend infrastructure code on Git. Suppose a team member wants to work on the same Amplify project, add some features to it and then push changes to the dev environment to test some changes. They would perform the following steps:
$ git clone <git-repo>
$ cd <project-dir>
$ git checkout -b mysandbox
$ amplify env add
? Do you want to use an existing environment? No
? Enter a name for the environment mysandbox
// Rest of init steps
// Add/update any backend configurations using amplify add/update <category>
$ amplify push
$ git push -u origin mysandbox
Next, suppose the team-member wants to move these changes to dev and master environments/branches:
$ git checkout dev
$ amplify env checkout dev
$ git merge mysandbox
$ amplify push
$ git push -u origin dev
After testing that everything works fine in the dev stage, you could now merge dev to the master git branch:
$ git checkout master
$ amplify env checkout master
$ git merge dev
$ amplify push
$ git push -u origin master
In this approach, you can consider the git branches (dev & master) as the source of truth and all the team members should work off the branches and keep their workspaces in sync.
Team-members sharing the same dev backend
You have two independent environments (master & dev) in the cloud and have corresponding git branches with your amplify backend infrastructure code on Git. Suppose all team members want to work on the same Amplify project and push backend related changes to the same dev environment to test their changes. Each team member would run the following:
$ git clone <git-repo>
$ cd <project-dir>
$ git checkout dev
$ amplify init
? Do you want to use an existing environment? Yes
? Choose the environment you would like to use:
❯ dev
master
// The rest of init steps
// Add/update any backend configurations using amplify add/update <category>
$ amplify push
$ git push -u origin dev
Since the team is sharing the same dev backend, periodically team members would need to pull in changes which their team members pushed for the dev environment to be in sync. Let’s pull in the changes from the dev branch & environment.
$ cd <your-project>
$ git checkout dev
$ amplify init
? Do you want to use an existing environment? Yes
? Choose the environment you would like to use:
❯ dev
master
$ amplify env pull
$ git pull origin dev
Sharing projects outside the team
Inside the amplify/ dir file-structure you will observe a team-provider-info.json file which contains a structure similar to the following:
{
    "dev": {
        "awscloudformation": {
            "AuthRoleName": "multenvtest-20181115101929-authRole",
            "UnauthRoleArn": "arn:aws:iam::132393967379:role/multenvtest-20181115101929-unauthRole",
            "AuthRoleArn": "arn:aws:iam::132393967379:role/multenvtest-20181115101929-authRole",
            "Region": "us-east-1",
            "DeploymentBucketName": "multenvtest-20181115101929-deployment",
            "UnauthRoleName": "multenvtest-20181115101929-unauthRole",
            "StackName": "multenvtest-20181115101929",
            "StackId": "arn:aws:cloudformation:us-east-1:132393967379:stack/multenvtest-20181115101929/fc7b1010-e902-11e8-a9bd-50fae97e0835"
        }
    },
    "master": {
        "awscloudformation": {
            "AuthRoleName": "multenvtest-20181115102119-authRole",
            "UnauthRoleArn": "arn:aws:iam::345090917734:role/multenvtest-20181115102119-unauthRole",
            "AuthRoleArn": "arn:aws:iam::345090917734:role/multenvtest-20181115102119-authRole",
            "Region": "us-east-1",
            "DeploymentBucketName": "multenvtest-20181115102119-deployment",
            "UnauthRoleName": "multenvtest-20181115102119-unauthRole",
            "StackName": "multenvtest-20181115102119",
            "StackId": "arn:aws:cloudformation:us-east-1:345090917734:stack/multenvtest-20181115102119/3e907b70-e903-11e8-a18b-503acac41e61"
        }
    }
}
This file is to be shared between team members, so that they have the ability to push/provision resources to the same Cloudformation stack and that way teams can work in a push/pull way and can always be in sync with the latest state of the project in the cloud.
Note: Team members would only be able to push to a stack only if they have the correct credentials (access key/secret keys) to do so.
If you want to share a project publicly and open source your serverless infrastructure, you should remove or put the amplify/team-provider-info.json file in gitignore file.
Quick Tips
- git and Amplify CLI should work hand in hand (ideally a CI tool should be used to automate this process - amplify CLI now provides headless support for its init/push commands. Check out https://github.com/aws-amplify/amplify-cli/tree/multienv/packages/amplify-cli/sample-headless-scripts for examples)
- git checkout
& amplify init (to initialize the env based on the git branch) should go hand in hand - git pull & amplify env pull should go hand in hand
- git push & amplify push should go hand in hand
Environment related commands
- amplify env add
Adds a new environment to your Amplify Project - amplify env list [–details] [–json]
Displays a list of all the environments in your Amplify project - amplify env remove
Removes an environment from the Amplify project - amplify env get –name
Displays the details of the environment specified in the command - amplify env pull –restore
Pulls your environment with the current cloud environment. Use the restore flag to overwrite your local backend configs with that in the cloud. - amplify env import
Imports an already existing Amplify project environment stack to your local backend. Here’s a sample usage of the same
#!/bin/bash
set -e
IFS='|'

AWSCLOUDFORMATIONCONFIG="{\
\"Region\": \"us-east-1\",\
\"DeploymentBucketName\": \"mytestproject-20181106123241-deployment\",\
\"UnauthRoleName\": \"mytestproject-20181106123241-unauthRole\",\
\"StackName\": \"mytestproject-20181106123241\",\
\"StackId\": \"arn:aws:cloudformation:us-east-1:132393967379:stack/mytestproject67-20181106123241/1c03a3e0-e203-11e8-bea9-500c20ff1436\",\
\"AuthRoleName\": \"mytestproject67-20181106123241-authRole\",\
\"UnauthRoleArn\": \"arn:aws:iam::132393967379:role/mytestproject67-20181106123241-unauthRole\",\
\"AuthRoleArn\": \"arn:aws:iam::132393967379:role/mytestproject67-20181106123241-authRole\"\
}"
PROVIDER_CONFIG="{\
\"awscloudformation\":$AWSCLOUDFORMATIONCONFIG\
}"


AWS_CONFIG="{\
\"configLevel\":\"project\",\
\"useProfile\":true,\
\"profileName\":\"default\"\
}"

amplify env import \
--name dev \
--config $PROVIDER_CONFIG \
--awsInfo $AWS_CONFIG \
--yes
You can get the AWSCLOUDFORMATIONCONFIG from the team-provider-info.json file from your existing Amplify project.
Hosting
There are multiple ways to deploy and host your Amplify app. Two options are listed below:
Amplify CLI
AWS Amplify Console
Using the Amplify CLI
The amplify publish command is designed to build and publish both the backend and the front end of the project. Depending on the stage that the project is at, the command can be configured to publish either to a DEV or a PROD environment. In the current implementation, the frontend publish is only available for JavaScript project for static web hosting. This is accomplished by the category plugin amplify-category-hosting, using Amazon S3 and Amazon CloudFront.
The amplify-category-hosting module uses the amplify-provider-awscloudformation to create and update the S3 and CloudFront resources. For more information of the Amazon S3 and Amazon CloudFront, check their docs: S3 static web hosting CloudFront DEV Guide
Workflow
amplify hosting add
This adds the hosting resources to the backend. The command will first prompt for environment selection, either DEV or PROD. Upon completion, the CloudFormation template for the resources is placed in the amplify/backend/hosting directory.amplify hosting configure
This command walks through the steps to configure the different sections of the resources used in hosting, including S3, CloudFront, and publish ignore. See below for more details.amplify publish
This command first builds and pushes the update of backend resources to the cloud (including the resources used in hosting), and then builds and publishes the frontend.
For the amplify-category-hosting implementation, the frontend build artifacts will be uploaded to the S3 hosting bucket, and then if the CloudFront is used and the command is executed with the--invalidateCloudFrontor-cflag, an invalidation request will be sent to the CloudFront to invalidate its cache.
Configuration
The command amplify hosting configure walks through the steps to configure the different sections of the resources used in hosting.
Website
Configures the S3 bucket for static web hosting, the user can set the index doc and error doc, both are set to beindex.htmlby default.CloudFront
Configures the CloudFront content delivery network (CDN), the user can configure TTLs (Time To Live) for the default cache behavior, and configure custom error responses.Publish
Configures the publish ignore patterns (just like what’s in the .gitignore) for the publish command, the publish command will ignore directories and files in the distribution folder that have names matching the patterns.
Stages
For the amplify-category-hosting implementation, there are two stages you can select from:
- DEV: S3 static web hosting
- PROD: S3 and CloudFront
It can take time to create and replicate a CloudFront Distribution across the global CDN footprint, in some cases 15 minutes or more. Therefore the Amplify CLI provides a DEV configuration with an S3 static site only when prototyping your application; and a PROD configuration when you are ready to deploy in production. Note that the DEV stage using S3 static sites does not have full HTTPS end to end so it is only recommended for prototyping your app.
CloudFront can also be added or removed in your project afterwards by the amplify hosting configure command. Note that if the hosting S3 bucket is newly created in regions other than us-east-1, you might get the HTTP 307 Temporary Redirect error in the beginning when you access your published application through CloudFront. This is because CloudFront forwards requests to the default S3 endpoint (s3.amazonaws.com), which is in the us-east-1 region, and it can take up to 24 hours for the new hosting bucket name to propagate globally.
Using the AWS Amplify Console
The AWS Amplify Console is a continuous deployment and hosting service for Amplify web apps. Learn more.
The AWS Amplify Console provides a Git-based workflow for building, deploying, and hosting your Amplify web app — both the frontend and backend — from source control. Once you connect a feature branch, all code commits are automatically deployed to an amplifyapp.com subdomain or your custom domain. Get started »