

Usage
Headless mode
Several commands in the Amplify CLI support arguments which could potentially be used in your CI/CD flows. The Amplify CLI arguments are not simple strings, but JSON objects containing information that the CLI would otherwise gather through prompts. The CLI will not prompt for input (work non-interactively) if the information it seeks is provided by an argument.
Arguments are used mostly for scripting so that the command execution flow is not interrupted by prompts. Examples for this could be found here
--yes flag
The --yes flag, or its alias -y, suppresses command line prompts if defaults are available, and uses the defaults in command execution.
The following commands take the --yes flag:
amplify initamplify configure projectamplify pushamplify publish
amplify init parameters
The ampify init command takes these parameters:
--amplify--frontend--providers--yes
--amplify
Contains basic information of the project, it has these keys:
projectName: the name of the project under developmentenvName: the name of your first environmentdefaultEditor: your default code editor
--frontend
Contains information for the CLI’s frontend plugin, it has these keys:
frontend: the name of the chosen frontend plugin (without theamplify-frontend-prefix).framework: the frontend framework used in the project, such asreact. Only thejavascriptfrontend handler takes it.config: the configuration settings for the frontend plugin.
There are currently three official frontend plugins, and the following are the specifications of their respective config object:
config for javascript
SourceDir: The project’s source directory. The CLI will place and update theaws-exports.jsfile in it, theaws-exports.jsfile is used to configure theAmplify JSlibrary.DistributionDir: The project’s distribution directory, where the build artifacts are stored. The CLI will upload the contents inside this directory to the S3 hosting buckets in the execution of theamplify publishcommand.BuildCommand: The build command for the project. The CLI invokes the build command before uploading the contents in the distribution directory in the execution of theamplify publishcommand.StartCommand: The start command for the project, used for local testing. The CLI invokes the start command after it has pushed the latest development of the backend to the cloud in the execution of theamplify runcommand.
config for android
ResDir: The Android project’s resource directory, such asapp/src/main/res.
config for ios
The ios frontend handler does NOT take the config object.
--providers
Contains configuration settings for provider plugins. The key is the name of the provider plugin (without the amplify-provider- prefix), and the value is its configuration. Provider plugins contained in this object will be initialized, and able to provide functionalities for creation and maintenance of the cloud resources.
Currently there is only one official provider plugin: amplify-provider-awscloudformation, its configuration is for the CLI to resolve aws credentials and region, the following are the specifications:
configLevel: The configuration level is eitherprojectorgeneral. Unless explicitly set togeneral, theprojectlevel is chosen.generallevel means the CLI will not manage configuration at the project level, it instead relies on the AWS SDK to resolve aws credentials and region. To learn how it works, check the AWS SDK’s documents on credentials and region.projectlevel means the configuration is managed at the project level by the CLI, each project gets its own independent configuration. The following attributes are used only when the configuration is at project leveluseProfile: A boolean indicating whether to use a profile defined in the shared config file (~/.aws/config) and credentials file (~/.aws/credentials).profileName: The name of the profile ifuseProfileis set to true.accessKeyId: The aws access key id ifuseProfileis set to false.secretAccessKey: The aws secret access key ifuseProfileis set to false.region: The aws region ifuseProfileis set to false.
Sample script
#!/bin/bash
set -e
IFS='|'

REACTCONFIG="{\
\"SourceDir\":\"src\",\
\"DistributionDir\":\"build\",\
\"BuildCommand\":\"npm run-script build\",\
\"StartCommand\":\"npm run-script start\"\
}"
AWSCLOUDFORMATIONCONFIG="{\
\"configLevel\":\"project\",\
\"useProfile\":false,\
\"profileName\":\"default\",\
\"accessKeyId\":\"headlessaccesskeyid\",\
\"secretAccessKey\":\"headlesssecrectaccesskey\",\
\"region\":\"us-east-1\"\
}"
AMPLIFY="{\
\"projectName\":\"headlessProjectName\",\
\"envName\":\"myenvname\",\
\"defaultEditor\":\"code\"\
}"
FRONTEND="{\
\"frontend\":\"javascript\",\
\"framework\":\"react\",\
\"config\":$REACTCONFIG\
}"
PROVIDERS="{\
\"awscloudformation\":$AWSCLOUDFORMATIONCONFIG\
}"

amplify init \
--amplify $AMPLIFY \
--frontend $FRONTEND \
--providers $PROVIDERS \
--yes
amplify configure project parameters
The amplify configure project command allows the user to change the configuration settings that were first set by amplify init, and it takes the same parameters as the amplify init command:
--amplify--frontend--providers--yes
Sample script
#!/bin/bash
set -e
IFS='|'

REACTCONFIG="{\
\"SourceDir\":\"src\",\
\"DistributionDir\":\"build\",\
\"BuildCommand\":\"npm run-script build\",\
\"StartCommand\":\"npm run-script start\"\
}"
AWSCLOUDFORMATIONCONFIG="{\
\"configLevel\":\"project\",\
\"useProfile\":false,\
\"profileName\":\"default\",\
\"accessKeyId\":\"headlessaccesskeyid\",\
\"secretAccessKey\":\"headlesssecrectaccesskey\",\
\"region\":\"us-east-1\"\
}"
AMPLIFY="{\
\"projectName\":\"headlessProjectName\",\
\"defaultEditor\":\"code\"\
}"
FRONTEND="{\
\"frontend\":\"javascript\",\
\"framework\":\"react\",\
\"config\":$REACTCONFIG\
}"
PROVIDERS="{\
\"awscloudformation\":$AWSCLOUDFORMATIONCONFIG\
}"

amplify configure project \
--amplify $AMPLIFY \
--frontend $FRONTEND \
--providers $PROVIDERS \
--yes
amplify push/publish parameters
The amplify publish command internally executes amplify push so it takes the same parameters as push command. The amplify push command takes the following parameters
--codegen--yes
--codegen
Contains configuration for AppSync codegen, the following are the specifications:
generateCode:
A boolean indicating if to generate code for your GraphQL API.codeLanguage:
The targeted language of the generated code, such asjavascript.fileNamePattern:
The file name pattern of GraphQL queries, mutations and subscriptions.generatedFileName:
The file name for the generated code.generateDocs:
A boolean indicating whether to generate GraphQL statements (queries, mutations and subscription) based on the GraphQL schema types. The generated version will overwrite the current GraphQL queries, mutations and subscriptions.
Sample script
#!/bin/bash
set -e
IFS='|'

CODEGEN="{\
\"generateCode\":true,\
\"codeLanguage\":\"javascript\",\
\"fileNamePattern\":\"src/graphql/**/*.js\",\
\"generatedFileName\":\"API\",\
\"generateDocs\":true\
}"

amplify push \
--codegen $CODEGEN \
--yes
IAM Policy for the CLI
The Amplify CLI requires the below IAM policies for performing actions across all categories. You can grant or restrict category permissions by including or removing items from the Action section as appropriate. For example, if you wish to restrict operations on the Auth category you can remove any of the lines starting with cognito.
{
    "Version": "2012-10-17",
    "Statement": [
        {
            "Sid": "VisualEditor0",
            "Effect": "Allow",
            "Action": [
                "appsync:*",

                "apigateway:POST",
                "apigateway:DELETE",
                "apigateway:PATCH",
                "apigateway:PUT",
                "cloudformation:CreateStack",
                "cloudformation:CreateStackSet",
                "cloudformation:DeleteStack",
                "cloudformation:DeleteStackSet",
                "cloudformation:DescribeStackEvents",
                "cloudformation:DescribeStackResource",
                "cloudformation:DescribeStackResources",
                "cloudformation:DescribeStackSet",
                "cloudformation:DescribeStackSetOperation",
                "cloudformation:DescribeStacks",
                "cloudformation:UpdateStack",
                "cloudformation:UpdateStackSet",
                "cloudfront:CreateCloudFrontOriginAccessIdentity",
                "cloudfront:CreateDistribution",
                "cloudfront:DeleteCloudFrontOriginAccessIdentity",
                "cloudfront:DeleteDistribution",
                "cloudfront:GetCloudFrontOriginAccessIdentity",
                "cloudfront:GetCloudFrontOriginAccessIdentityConfig",
                "cloudfront:GetDistribution",
                "cloudfront:GetDistributionConfig",
                "cloudfront:TagResource",
                "cloudfront:UntagResource",
                "cloudfront:UpdateCloudFrontOriginAccessIdentity",
                "cloudfront:UpdateDistribution",
                "cognito-identity:CreateIdentityPool",
                "cognito-identity:DeleteIdentityPool",
                "cognito-identity:DescribeIdentity",
                "cognito-identity:DescribeIdentityPool",
                "cognito-identity:SetIdentityPoolRoles",
                "cognito-identity:UpdateIdentityPool",
                "cognito-idp:CreateUserPool",
                "cognito-idp:CreateUserPoolClient",
                "cognito-idp:DeleteUserPool",
                "cognito-idp:DeleteUserPoolClient",
                "cognito-idp:DescribeUserPool",
                "cognito-idp:UpdateUserPool",
                "cognito-idp:UpdateUserPoolClient",
                "dynamodb:CreateTable",
                "dynamodb:DeleteItem",
                "dynamodb:DeleteTable",
                "dynamodb:DescribeTable",
                "dynamodb:PutItem",
                "dynamodb:UpdateItem",
                "dynamodb:UpdateTable",
                "iam:CreateRole",
                "iam:DeleteRole",
                "iam:DeleteRolePolicy",
                "iam:GetRole",
                "iam:GetUser",
                "iam:PassRole",
                "iam:PutRolePolicy",
                "iam:UpdateRole",
                "lambda:AddPermission",
                "lambda:CreateFunction",
                "lambda:DeleteFunction",
                "lambda:GetFunction",
                "lambda:GetFunctionConfiguration",
                "lambda:InvokeAsync",
                "lambda:InvokeFunction",
                "lambda:RemovePermission",
                "lambda:UpdateFunctionCode",
                "lambda:UpdateFunctionConfiguration",
                "s3:*"
            ],
            "Resource": "*"
        }
    ]
}
IAM Roles & MFA
You can optionally configure the Amplify CLI to assume an IAM role by defining a profile for the role in the shared ~/.aws/config file. This is similar to how the AWS CLI functions, including short term credentials. This can be useful when you have multiple developers using one or more AWS accounts, including team workflows where you want to restrict the category updates they might be permitted to make.
When prompted during the execution of amplify init or the amplify configure project command, you will select a configured profile for the role, and the Amplify CLI will handle the logic to retrieve, cache and refresh the temp credentials. If Multi-Factor Authentication (MFA) is enabled, the CLI will prompt you to enter the MFA token code when it needs to retrieve or refresh temporary credentials.
The Amplify CLI has its own mechanism of caching temporary credentials, it does NOT use the same cache of the AWS CLI. The temporary credentials are cached at ~/.amplify/awscloudformation/cache.json. You can remove all cached credentials by removing this file.
If you only want to remove the cached temp credentials associated with a particular project, execute amplify awscloudformation reset-cache or it’s alias amplify aws reset-cache in the project.
Step by step guide to create and assume an IAM role
The following is a step by step guide on how to create an IAM role and make it available for the Amplify CLI.
The setup has three parts, we will use an example to demonstrate this capability.
Assume Biz Corp has decided to hire Dev Corp to develop its inventory management web portal, and Dev Corp is using the Amplify CLI to speed up the development process.
Part #1: Set up the role (Biz Corp)
- Sign in to the AWS Management Console and open the IAM console.
- In the navigation pane of the console, choose
Rolesand then chooseCreate role. - Choose the
Another AWS accountrole type. - For Account ID, type Dev Corp’s AWS account ID (the account ID of the entity you want to grant access to your AWS resources).
- Although optional, it is recommended to select
Require external IDand enter the external id given to you by Dev Corp. (click here for more details on external IDs). - If you want to restrict the role to users who sign in with multi-factor authentication (MFA), select
Require MFA(click here for more details on MFA). - Choose
Next: Permissions. - Select permissions policies that you want the developers from Dev Corp to have when the role is assumed.
Note: You MUST grant the role permissions to perform CloudFormation actions and create associated resources (depending on the categories you use in your project) such as:
- Cognito User and Identity Pools
- S3 buckets
- DynamoDB tables
- AppSync APIs
- API Gateway APIs
- Pinpoint endpoints
- Cloudfront distributions
- IAM Roles
- Lambda functions
- Lex bots
- Choose
Next: Tagging, attach tags if you want (optional). - Choose
Next: Review, type a name for your role, and optionally add the role description. - Enter the required fields such as the “Role name”.
- Choose
Create role. - Give the Role Arn to Dev Corp.
Part #2: Set up the user to assume the role (Dev Corp)
2.1 Create a policy that has permission to assume the role created above by Biz corp.
- Get the Role Arn from Biz Corp.
- Sign in to the AWS Management Console and open the IAM console. (Assuming Dev corp has a separate AWS account).
- In the navigation pane of the console, choose
Policiesand then chooseCreate policy. - Select the ‘JSON’ tab and paste the following contents in the pane, replacing
<biz_corp_rol_arn>with the value previously noted.{ "Version": "2012-10-17", "Statement": [ { "Effect": "Allow", "Action": "sts:AssumeRole", "Resource": "<biz_corp_rol_arn>" } ] } - Choose
Review policy. - Type in the policy Name, and optionally add the policy description.
- Choose
Create policy.
2.2 Attach the policy to the user
- Sign in to the AWS Management Console and open the IAM console.
- In the navigation pane of the console, choose
Usersand then chooseAdd user. - Type the
User namefor the new user. - Select Programmatic access for
Access type. - Choose
Next: Permissions. - On the Set Permissions Page, select
Attach existing policies directly. - Select the policy created in 2.1.
- Choose
Next: Tagging, attach tags if you wish (optional). - Choose
Next: Review. - Choose
Create User. - Click
Download .csvto download a copy of the credentials. You can, optionally, copy paste the Access Key ID and Secret Access Key and store it in a safe location. These credentials would be used in a later section.
2.3 Assign MFA device (Optional)
This must be set up if the Biz Corp selected to Require MFA when creating the role. This needs to be set up by Dev Corp users and in their respective AWS account.
We are using a virtual MFA device, such as the Google Authenticator app, in this example.
- Sign in to the AWS Management Console and open the IAM console.
- In the navigation pane of the console, choose
Usersand select the user created above in 2.2. - Select the
Security Credentialstab. - Next to the
Assigned MFA devicelabel, choose theManageoption. - In the Manage MFA Device wizard, choose
Virtual MFA device, and then chooseContinue. - Choose
Show QR codeif the MFA app supports QR code, and scan the QR code from your virtual device(Google Authenticator app in our case), if not, chooseShow secret keyand type it into the MFA app. - In the MFA code 1 box, type the one-time password that currently appears in the virtual MFA device. Wait for the device to generate a new one-time password. Then type the second one-time password into the MFA code 2 box. Then choose Assign MFA.
- Copy the MFA device arn next to
Assigned MFA device, which will be used in part 3.
Part #3: Set up the local development environment (Dev Corp)
- On the local development system, create the following two files if they do not exist.
~/.aws/config
~/.aws/credentials - Insert the following contents into the
~/.aws/configfile:
[profile bizcorprole]
role_arn=<role_arn_from_part#1>
source_profile=devcorpuser
mfa_serial=<mfa_serial_from_part_2.3---optional>
external_id=<external_id_as_mentioned_in_part#1--optional>
region=us-east-1

[profile devcorpuser]
region=us-east-1
mfa_serial and external_id are optional, leave them out if they are not configured.
- Insert the following contents into the
~/.aws/credentialsfile:[devcorpuser] aws_access_key_id=<key_id_from_part_2.2> aws_secret_access_key=<secret_access_key_from_part_2.2>Now, when Dev Corp is trying to initialize an Amplify Project, the user can select the
bizcorproleprofile configured above, and based on the authentication method set up the user would be prompted with corresponding questions such as MFA codes. After this, the user would be able to successfully deploy/manage AWS resources in Biz corps account (based on the access policies set by the Biz corp).
You can take a look at AWS IAM and the AWS CLI documentation for more details on IAM role and its usage.
Architecture
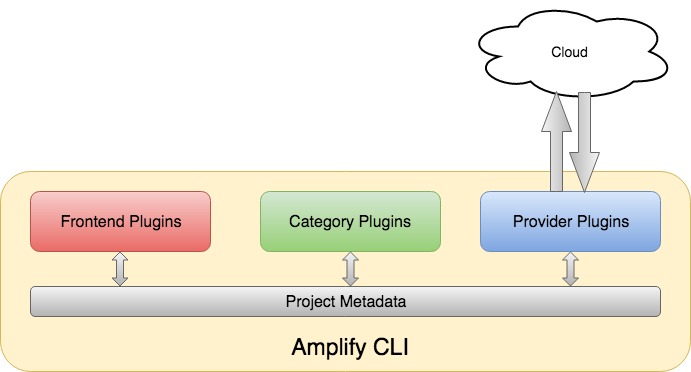
The Amplify CLI uses gluegun. The CLI core provides the pluggable platform, and most of the CLI category functions are implemented as plugins. The CLI core searches for plugins in the global node_modules directory, and its own node_modules directory. Plugins are recognized by the amplify- prefix in the package names.
Plugins communicate with the CLI core, and with each other, through the project metadata. The CLI core provides the read and write access to the project metadata for the plugins. The project metadata is stored in file amplify/backend/amplify-meta.json in the user project, see below for more details of the meta data file.
Plugin types
There are four types of plugins
- category
- provider
- frontend
- general purpose
Category plugin
Recognized by the amplify-category- prefix in the package name, a category plugin wraps up the logic to create and manage one category of backend resources in the cloud. It defines the “shape” of the cloud resources based on user (the developer) input, constructs parameters to CRUD cloud resource, and exports relevant cloud resource information to the project metadata.
Categories are managed by AWS and are a functional use case that a client engineer is building as part of their UX, rather than service implementations.
Provider plugin
Recognized by the amplify-provider- prefix in the package name, a provider plugin abstracts the actual cloud resource provider. It wraps up communication details such as access credentials, api invoke and wait logic, and response data parsing etc. and exposes simple interface methods for the category plugins to CRUD cloud resource.
Frontend plugin
Recognized by the amplify-frontend- prefix in the package name, a frontend plugin handles a specific type of frontend projects, such as Javascript, Android or iOS projects. Among other things, it provides these functionalities:
- Formats the cloud resource information and writes it to a file at the right location so it can be recognized and consumed by the frontend project
- Builds and serves the frontend application locally with backend hot-wired to the cloud resources
- Builds and publishes the application (frontend and backend) to its intended users
General purpose plugin
Recognized by the amplify- prefix, without a plugin type decoration, in the package name, a general purpose plugin does not manage any backend resources in the cloud, but provides certain CLI commands and/or certain functionalities for the CLI core, and other plugins.
Official plugins
- amplify-category-analytics
- amplify-category-api
- amplify-category-auth
- amplify-category-function
- amplify-category-hosting
- amplify-category-notifications
- amplify-category-storage
- amplify-category-interactions
- amplify-codegen
- amplify-frontend-javascript
- amplify-frontend-android
- amplify-frontend-ios
- amplify-provider-awscloudformation
Third party plugin setup
You can add a 3rd party plugin to the Amplify CLI with the following steps:
- The plugin author names the plugin package according to the naming convention outlined above and publishes it to the npm registry.
- The plugin user executes
npm install -g <plugin>and installs the plugin to the global node_modules directory.
The plugin is then picked up by the CLI core and used the same as the official plugins. Click here for more details on how to author new plugins.
AWS CloudFormation
Currently, the only official provider plugin, amplify-provider-awscloudformation, uses the AWS CloudFormation to form and update the backend resources in the AWS for the amplify categories. For more information about AWS CloudFormation, check its user guide: AWS CloudFormation User Guide
How the CLI works
The amplify-provider-awscloudformation uses nested stacks
Amplify CLI Artifacts
Amplify folder structure
The CLI places the following folder structure at the root directory of the project when init is completed successfully:
amplify
.config
#current-cloud-backend
backend
amplify/.config folder
Contains files that store cloud configuration and user settings/preferences
amplify/#current-cloud-backend folder
Contains backend resources specifications in the cloud from the last synchronization, by the amplify push or amplify env pull command. Each plugin stores contents in its own subfolder inside this folder.
amplify/backend folder
It contains the latest local development of the backend resources specifications to be pushed to the cloud. Each plugin stores contents in its own subfolder inside this folder.
Amplify Files
amplify-meta.json file
Both the amplify/backend and amplify/#current-cloud-backend directories contain an amplify-meta.json file. The amplify-meta.json in the backend directory serves as the whiteboard for the CLI core and the plugins to log information for themselves, and to communicate with each other.
The CLI core provides read and write access to the file for the plugins. Core collects the selected providers’ outputs after init and logs them under the “providers” object, e.g. the awscloudformation provider outputs the information of the root stack, the deployment S3 bucket, and the authorized/unauthorized IAM roles, and they are logged under the providers.awscloudformation object. Each category plugin logs information under its own name.
Because one category might create multiple services within one project (e.g. the interactions category can create multiple bots), the category metadata generally follows a two-level structure like the following:
{
    <category>: {
        <service1>: {
            //service1 metadata
        },
        <service2>: {
            //service2 metadata
        }
    }
}
The metadata for each service is first logged into the meta file after the amplify <category> add command is executed, containing some general information that indicates one service of the category has been added locally.
Then, on the successful execution of the amplify push command, the output object will be added/updated in the service’s metadata with information that describes the actual cloud resources that have been created or updated.
aws-exports.js file
This file is generated only for JavaScript projects.
It contains the consolidated outputs from all the categories and is placed under the src directory that the user (the developer) specified during the init process. It is updated after each successful execution of the amplify push command, that has created or updated the cloud resources.
This file is consumed by the Amplify JavaScript library for configuration. It contains information which is non-sensitive and only required for external, unauthenticated actions from clients (such as user registration or sign-in flows in the case of Auth) or for constructing appropriate endpoint URLs after authorization has taken place. Please see the following more detailed explanations:
- Cognito security best practices for web app
- Security / Best Practice for poolData (UserPoolId, ClientId) in a browser JS app
- Are the Cognito User pool id and Client Id sensitive?
awsconfiguration.json file
This file is generated for Android and iOS projects.
It contains the consolidated outputs from all the categories. It is updated after each successful execution of the amplify push command, that has created or updated the cloud resources.
This file is consumed by the iOS and Android native SDKs for configuration. It contains information which is non-sensitive and only required for external, unauthenticated actions from clients (such as user registration or sign-in flows in the case of Auth) or for constructing appropriate endpoint URLs after authorization has taken place. Please see the following more detailed explanations: